-
Set Up
-
Set up Azure account here
-
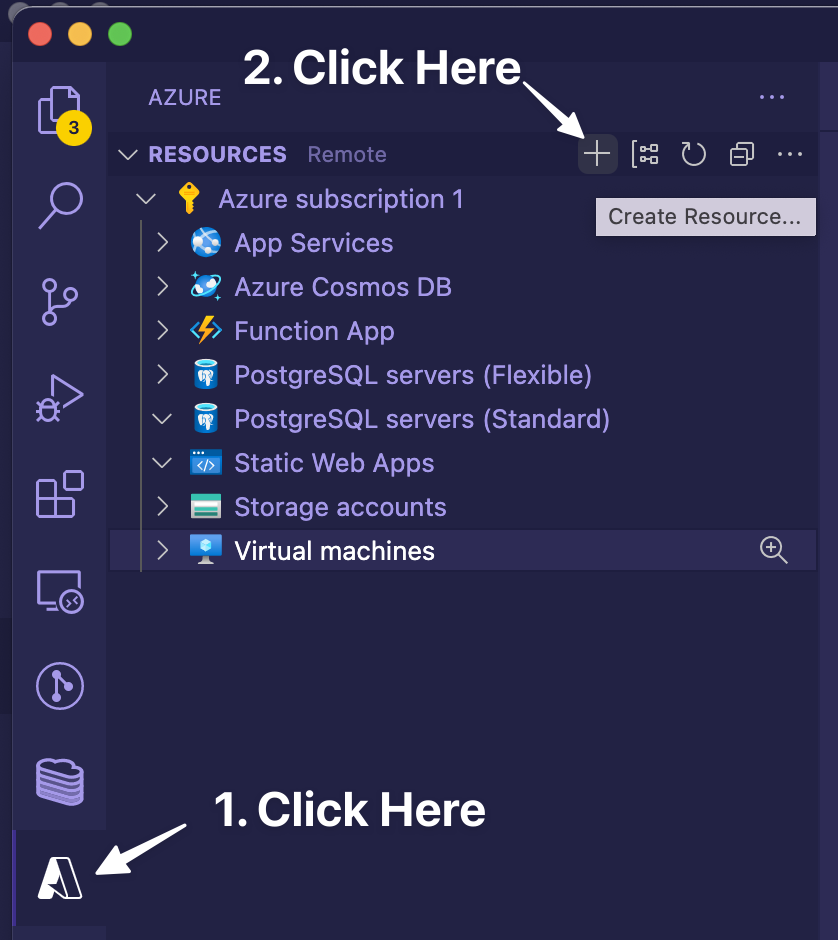
Install the Azure Virtual Machines VSCode extension & sign in
-
Create a new Virtual Machine
-
-
Connect to the newly created VM
-
-
Dependendencies
-
Update apt-get
-
sudo apt-get update
-
-
Install RBenv, ruby-build, and dependencies
-
sudo apt-get install git-core curl zlib1g-dev build-essential libssl-dev libreadline-dev libyaml-dev libxml2-dev libxslt1-dev libcurl4-openssl-dev libffi-dev

git clone https://github.com/rbenv/rbenv.git ~/.rbenv
echo 'export PATH="$HOME/.rbenv/bin:$PATH"' >> ~/.bashrc
echo 'eval "$(rbenv init -)"' >> ~/.bashrc
exec $SHELL

git clone https://github.com/rbenv/ruby-build.git ~/.rbenv/plugins/ruby-build
echo 'export PATH="$HOME/.rbenv/plugins/ruby-build/bin:$PATH"' >> ~/.bashrc
exec $SHELL

rbenv install --verbose 3.1.2
rbenv global 3.1.2
ruby -v
-
-
Set up Postgres
-
From here
-
sudo apt install postgresql postgresql-contrib -
sudo systemctl start postgresql.service -
Rails will attempt to connect to Postgres using the current user (normally called
azureuser), so we need to create this user -
sudo su - postgres
createuser -s -r azureuser
-
-
Allow local access to postgres
-
From this answer
-
Replace "13" with your version of Postgres
-
sudo nano /etc/postgresql/13/main/pg_hba.conf -
Then replace "md5" with "trust" for ipv4 local connections and ipv6 local connections
-
-
Installing missing postgres headers
-
sudo apt-get install libpq-dev
-
-
Rails Setup
-
Clone the rails starter, or your repo
-
git clone https://github.com/editmodelabs/rails-starter.git new-app
cd new-app
-
-
Then do normal rails installation
-
gem install bundler
bundle install
rake db:create
rake db:migrate
-
-
Start Server and bind to 0.0.0.0
-
rails s -b 0.0.0.0
-
-
Visit it in a browser
-
By default Azure should give you a fixed IP address for the VM, and set some firewall rules to allow http traffic to port 80. You can get the ip address by right clicking the virtual machine in the list. If the previous steps worked ok this ip address should now show your running rails app
-

-
-
Setting up Nginx & Passenger
-
Instal Nginx
-
sudo apt update sudo DEBIAN_FRONTEND=noninteractive apt --yes install nginx -
Install Passenger - steps here
-
sudo apt-get install -y dirmngr gnupg
sudo apt-key adv --keyserver hkp://keyserver.ubuntu.com:80 --recv-keys 561F9B9CAC40B2F7
sudo apt-get install -y apt-transport-https ca-certificates

sudo sh -c 'echo deb https://oss-binaries.phusionpassenger.com/apt/passenger bionic main > /etc/apt/sources.list.d/passenger.list'
sudo apt-get update

sudo apt-get install -y libnginx-mod-http-passenger

if [ ! -f /etc/nginx/modules-enabled/50-mod-http-passenger.conf ]; then sudo ln -s /usr/share/nginx/modules-available/mod-http-passenger.load /etc/nginx/modules-enabled/50-mod-http-passenger.conf ; fi
sudo ls /etc/nginx/conf.d/mod-http-passenger.conf

sudo service nginx restart

sudo /usr/bin/passenger-config validate-install
-
-
passenger-config about ruby-command
-
-
Set up SSL
-
These instructions are from LetsEncrypt's site
-
Pre-requisite: Create an A record in Cloudflare that points a subdomain to the public IP address of the Microsoft VM, and ensure it's working.
-
Update snap
-
sudo snap install core; sudo snap refresh core -
Install certbot
-
sudo snap install --classic certbot -
Run Certbot
-
First stop any running server
-
sudo certbot -d yoursite.com --manual --preferred-challenges dns certonly
-
-
Point Nginx to your Rails App
-
Create a new entry in
/etx/nginx/sites-available -
server {

  listen 80;
  listen [::]:80;

  root "/home/azureuser/apps/1. Live/yoursite.com/public";

  index index.html index.htm index.nginx-debian.html;

  server_name google.com;

  passenger_enabled on;
  passenger_ruby /home/azureuser/.rbenv/versions/3.0.0/bin/ruby; # Ensure you have this pointing to the correct version of ruby

  listen 443 ssl; # managed by Certbot

  # RSA certificate
  ssl_certificate /etc/letsencrypt/live/yoursite.com/fullchain.pem; # managed by Certbot
  ssl_certificate_key /etc/letsencrypt/live/yoursite.com/privkey.pem; # managed by Certbot

  include /etc/letsencrypt/options-ssl-nginx.conf; # managed by Certbot

  # Redirect non-https traffic to https
  if ($scheme != "https") {
    return 301 https://$host$request_uri;
  } # managed by Certbot

}
-
-
Other Tips
-
Enabling persistent process for the rails server
-
By default, if you run a process (for example, start a rails server), that process will die as soon as you get disconnected (e.g shut down VS code or disconnect from the internet).
-
To prevent this from happening, we can use tmux
-
See all tmux sessions running
-
tmux ls
-
-
Create a new tmux session and start a rails server
-
tmux new -s SESSION_NAME
rails s -b 0.0.0.0
-
-
Attach to an existing tmux session and start a rails server
-
tmux a -t SESSION_NAME
rails s -b 0.0.0.0
-
-
-
Prevent annoying issues with watching files (particularly if more than one person using the VM at once)
-
Open sysclt.conf
-
sudo nano /etc/sysctl.conf -
Add this line to the end
-
fs.inotify.max_user_watches=524288 -
Refresh settings
-
sudo sysctl -p
-
-
Setting Up Monitoring
-
The default Azure monitoring is not great. The best single-screen-dashboard alternative I've found is Netdata Cloud - it's currently free. First sign up for a free account here, then
-
wget -O /tmp/netdata-kickstart.sh https://my-netdata.io/kickstart.sh && sh /tmp/netdata-kickstart.sh
-
-
Setting Up Delayed Jobs
-
The biggest issue I found with delayed job was performance issues when running multiple parallel workers - this would consume a lot of CPU, and the CPU usage would remain high even after the jobs had been processed. See
-
Adding a delayed job initializer and telling it not to reload the app each run.
-
# config/initializers/devise.rb Delayed::Worker.instance_exec do def self.reload_app? false end end -
And ensuring that
cache_classeswas set to true in the environment file -
# config/production.rb

config.cache_classes = true
-
-
How to get an Azure cloud Rails environment running via VS Code